Nowadays there are mobile applications that support both native and webview. You might know them as hybrid mobile applications. Their popularity makes both native and hybrid apps testing very important. So the chances of bug leakage are reduced to the minimum.
Appium is a popular automation testing tool used for Native and hybrid apps testing. For starting with Appium automation, we should have some pre-requisites configurations in our system. In this Appium tutorial, you will learn about setup Appium from scratch and getting it running on your mobile devices.
Most companies today are shifting their products to mobile-based applications as they are more user-friendly. With this, it becomes very important to test every little detail of the application.
Whether it is performance or functionalities, a tester must test every bit of them. Also, testing needs to happen on the different versions of operating systems and new devices available in the market. For this, a tester has to use a vast set of devices and OS as part of a testing bed.
There are three types of applications – native, web, and hybrid mobile applications. It is very important to do functional, UI, compatibility, interface, performance, security, and field testing as part of mobile automation testing. Let us go through this mobile automation tutorial to give you insights into tidbits of mobile application testing.
Testing Types for Mobile Testing
-
Functional Testing
We must test all business scenarios as part of functional testing. All user scenarios should be tested regressively.
-
UI Testing
In this we verify the alignment of elements and text. We also verify the look and feel of the application. Likewise, the size of fields along with color on different screens is tested as part of UI testing.
-
Compatibility Testing
The mobile application is subjected to testing on different operating systems and devices which are part of the testing bed.
-
Network Testing
In this, the request and response time of different services are analyzed. Application is tested regressively under both strong Wi-Fi connection and low bandwidth network connection. Response time of loading elements on the home page is the main testing area.
-
Performance Testing
Application testing happens under high load when memory and the battery are at a very low level. Application behavior for bad network reception is also tested as part of performance testing.
-
Security Testing
Privacy and security should not be at stake for highly secure applications. So, especially for banking applications, we verify encryption and decryption of data. Different tools like ZAP OWASP are leveraged for security testing.
Overview of native and hybrid applications
Let us understand native vs hybrid mobile apps first. Native mobile applications are designed in such a way that they work well on a particular operating system along with a mobile device. They use device-specific hardware and other configuration.
On the other hand, hybrid applications are a combination of native and web applications. They are designed in web technology languages like HTML, CSS. But then, they are integrated into native applications.
Hybrid apps are not installed in mobile apps rather they are accessible over the Internet. Also, they are not made for specific mobile devices. The same codebase can be shared for different devices. It is very important to do native and hybrid app testing so that customers get the best product.
If you are looking to ensure that your customers enjoy as a bug-free experience as possible, testscenario can help with its mobile app testing services.
There are a lot of hybrid and native app testing tools but one which is primarily used is Appium. Let’s further drill down into Appium architecture.
Appium Architecture
Let us now know more about Appium. It is a server that is written in node.js language which acts as a rest API interface between java client and mobile device.
HTTP requests are sent between client and server via Appium server to create a session. This session is maintained with the help of desired capabilities object. The object is for creating customized sessions. A session is created and then a session id is returned which is used for further communication.
Different languages can be used with Appium such as Java, Python, C#, etc.
Pre-Requisites
Before starting with mobile application testing using Appium, some prerequisites should be installed in your system so that we can run our tests without any hassle.
- JDK Installation
- Environment Path for Java
- Android Studio Installation
- Android SDK Package Installation
- NodeJs Installation
- Appium Desktop Installation
- Environment Path for Android
- IDE Installation
Locating Element using UIAutomatorViewer
To start with mobile application testing, you should know how to locate elements in the mobile device. It’s just like in web applications.
Elements can be located in a mobile device using UIAutomatorViewer. Connect your mobile device with your system. To make sure it is connected successfully, open the command prompt and run the command: adb devices. If you get your device on the list of devices, then you are all set to go.

For starting UIAutomator Viewer, you can go to the android installation folder. You have to run a file named uiautomatorviewer.bat file.

For reflecting your mobile view on the left side, you need to take a snapshot of your mobile. You need to click on the device screenshot on the top icon bar and then a snapshot of your device. You can then go through elements and their properties will be reflected on the right side.
Now, you must be wondering which is the best locator to identify an element. It is of course resource id. But sometimes, when it is dynamic or not available, we need to take the help of other locators.
For identifying an android element, you have to use the findElement or find elements method of Webdriver. It receives By as input parameter and further you can give property name with By to identify an android element. Driver.findElement(By.propertyName(“”)). Other property names can be name, content-desc, classname, resource-id, or XPath.
Locating elements using Appium Inspector
UIAutomatorViewer comes packaged with android SDK but while testing on a MAC device, you need to take the help of Appium Inspector. This comes as default with the Appium desktop application.

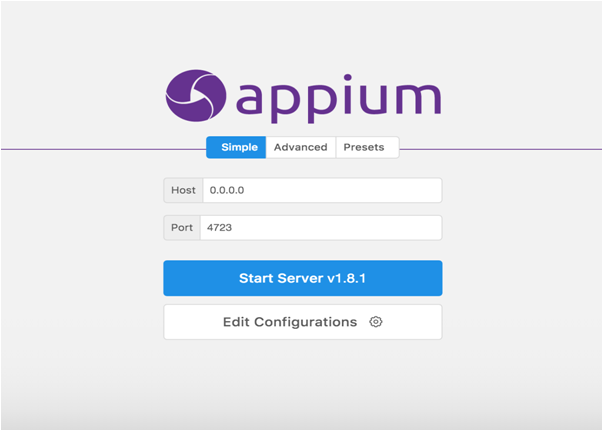
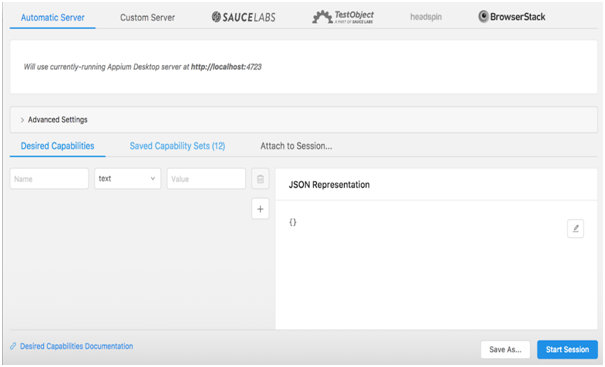
You need to click on “Start Server” and then on the search icon to start the Appium inspector. It accepts Desired Capabilities object to initiate a session with the mobile device. After providing these things, you need to click on the start session. Further, you can inspect an element on Appium inspector and its properties will be listed on the right section.


Identifying app package and app activity for your application
To start with native and hybrid apps testing, you need to know the app package and app activity of your application. Let us look at the steps to know these pre-requisites.
1) Connect your device to your system, open the command prompt and then fire command:adb shell. Wait for the prompt symbol in the command prompt. Open application in mobile device and then fire command: dumpsys window windows | grep -E ‘mCurrentFocus|mFocusedApp’to fetch the app package and app activity.
2) APK Info.The app can be used to identify app package and app activity. Install it via Google Play Store. Open this app and then search for your application. Once you click on it, click on the detailed section and there you will get to know the app package and app activity.
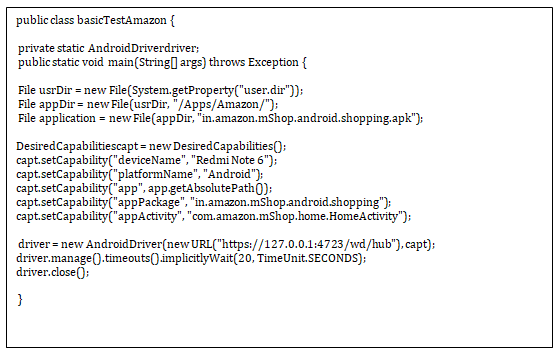
Basic Appium Test to launch Amazon application.
Let us now deep dive into writing a basic Appium test for amazon application. First, you need to know the app package and app activity. You can use the above ways to find out both. Do not forget to start the Appium server. The below test will open the amazon application in your mobile application and then exit.

How to find if some app is hybrid or native
Amazon was a native app. But how to find if some app is native or hybrid? You can find this by fetching the context handles Set<String>contextNames = driver.getContextHandles(); If they are more than one context: NATIVE_APP and WEBVIEW then that application is hybrid and if only a native context is present then that is a native application.
Get the current context: For fetching the current context, one can use command: String context = driver.getContext(); This would return web or native context.
Setting particular context: If there are more than one contexts and you want to switch to another context, then you have to use the command: driver.context(“NATIVE_APP”);
What to test in native and hybrid apps?
Let us look at what all to test in native and hybrid apps. We have to test various features of our application which can include scrolling, double-tapping, single tapping, or various operations which we perform manually.
To implement these, you should know the commands of Appium. It will help you in fulfilling these methods. Let us look at the important commands of Appium.
Commands for Appium
Device Commands:
1) Start app activity: To start another application between the test, you can take the help of the below command.
driver.startActivity(new Activity (“app package”, “app activity”));
2) Fetch current activity: To fetch the current activity one can use the current activity function of the WebDriver interface.
driver.currentActivity();
3) Fetch current Package: To fetch the current package one can use the current package function of the WebDriver interface.
driver. getCurrentPackage();
4) App Installation in device: To install the application on the device, one can use the install app function of the WebDriver interface.
driver.installApp("Path of apk");
5) To check if the app is installed or not: To check the application is installed in the device, one can use the isAppInstalled function of the WebDriver interface.
driver.isAppInstalled("app acitivity")
6) Unlock device: To unlock the device, unlock device method can be used.
driver.unlock device();
7) Hide keyboard: To hide the keyboard, the hide keyboard method can be used.
Driver.hideKeyboard();
8) Screenshot: getScreeshotAs function can be used to take the screenshot. The output type is File.
((TakesScreenshot)driver).getScreenshotAs(OutputType.FILE);
Element Commands:
1) Find Element: To identify an android element in your device then you can use command: findElement(By.className(“”)); Property name can be id, classname, content-desc, or XPath.
2) Search multiple elements: If there is more than one element that matches a property then you can use find elements.It returns a list of elements and if elements do not exist then 0 elements are returned. No exception is thrown at this case. You can use command: findelements(By.id(“”));
3) Click, send Keys and Clear an element: There are situations where one needs to click, send keys, and clear an android element. The below commands will help in clicking, sending keys, and clearing an element.
driver.findElement(By.id(“”)).click();

driver.findElement(By.id(“”)).sendKeys();

driver.findElement(By.id(“”)).clear();
Element Interactions:
1) Move To: Move the cursor to the element and then move by some offset of the x-axis and y-axis. The below command moved to the element and then moved by offset 15,15 in the x-axis and y-axis.
Actions action = new Actions();

action.moveTo(element, 15,15);

action.perform();
2) Double click: Double click can be done by doubleClick function as explained below.
Actions action = new Actions(driver);

action.moveTo(element);

action.doubleClick();

action.perform()
3) Single Tap: For a single tap, use the function explained below.
TouchActions action = new TouchActions(driver);

action.singleTap(element);

action.perform();
4) Double Tap: For double-tap, use the below explained method.
TouchActions action = new TouchActions(driver);

action.doubleTap(element);

action.perform();
5) Long Tap: For long tap, use the below method.
TouchActions action = new TouchActions(driver);

action.longPress(element);

action.perform();
6) Scrolling using offset: One can scroll using the scroll method. We need to pass offset while we need to scroll from the element.
TouchActions action = newTouchActions(driver);

action.scroll(element, 10, 100);

action.perform();
7) Swiping from one element to another: To swipe from one element to another, use the press and moveTo methods as explained below.
TouchAction().press(el1).moveTo(el2).release()
8) Multi-Touch Action: Multiple actions can be done using the Multi-touch action class. You can create different touch action objects and then pass them to multi actions class.
TouchAction act1 = new TouchAction();

TouchAction act2 = new TouchAction();

MultiTouchAction actions = new MultiTouchActions();

actions.add(act1);

actions.add(act2);
Conclusion
Follow the above steps to start your native and hybrid mobile application testing. Native app testing tools such as Appium can be utilized to perform native and hybrid apps testing.
If you are looking to get your mobile app tested, testscenario can help you achieve your desired objectives with its excellent software testing infrastructure and talent.


